| Tips and Techniques |
|
| Tips and Techniques |
|
The purpose of this section is to present novel or interesting solutions to problems of working with cichlids. These might be of interest to either the hobbyist or the scientistific researcher.
I welcome your contributions, including comments or improvements on any posting.
- Stripping Embryos from Mouthbrooding Cichlids
- Hatching Baby Brine Shrimp Eggs
- Capturing Cichlids in a Complex Aquarium
- Observing Spawning Behavior and Eggs
- Inexpensive Plastic Plants
- Egg Crate Spawning Divider
- Use a Background on your Aquarium
Stripping (Removing) Embryos from Mouthbrooding Cichlids
By: Rich Bireley (rbireley@cdpr.ca.gov)
Equipment:
Large fine-meshed net, wide shallow bowl, turkey baster, Bic pen cap (the piece that sticks down has a rounded end and lunate shaft and is found on the 12 for $1.00 package).
Procedure:
Use care when netting mouthbrooding cichlids which appear to be "holding". Try not to chase or startle them as they may spit out the brood prematurely. I strip large fish, fish with small heads, and very small fish in the net suspended in the fish's tank. Fish which are easy to hold I strip directly into the bowl.
With your less dexterous hand, gently but firmly grasp the fish about the body. Your thumb should be resting across the fish's forehead, and your index finger behind the operculum. Hold the fish head down in water at least to the posterior edge of the operculum. Very carefully, slide the edge of the pen cap into the fishes mouth. If possible, rather than pulling the mouth open, rotate the cap so the jaws are leveraged open. This prevents dislocation of the upper jaw.
While the jaw is open, lift the brooding fish up, then lower it to move water through the operculum. This will wash out the embryos. Free swimming fry can be put directly into a fry tank while embryos may need to be placed into an egg tumbler.
While some people use their fingernails, toothpicks or any convenient object to open the jaw, I have never injured a fish with the pen cap.
Stripping is stressful to the fish. As I emphasized before, exercise care as fish may die if they are handled too roughly.
Hatching Baby Brine Shrimp Eggs
Newly hatched baby brine shrimp are one of the best foods for baby cichlids. You can buy these frozen, but frozen brine shrimp don't move and it is the movement of brine shrimp which makes them so enticing to baby fish.
Fortunately, it is very simple to hatch brine shrimp eggs. It does not take a lot of equipment and takes only a few minutes to set-up.
First, what are brine shrimp? For everything (and more) that you ever wanted to know about brine shrimp, go to the Brine Shrimp Direct website. Here, I present a brief summary. Brine shrimp are invertebrates from the genus Artemia. As a child, you may have encountered them as "sea monkeys". Despite advertisements to the contrary, they do not dress in little hats and play all sorts of magical games. They are interesting to watch for a few minutes as they go about their shrimp business.
Brine shrimp of various species are found in salty waters around the world. In the United States, they are harvested from San Francisco Bay and from Great Salt Lake. Adult brine shrimp make excellent food for juvenile and adult cichlids.
Under certain conditions, brine shrimp form what are technically called cysts but are usually called eggs by most people. These eggs accumulate in the wild in large floating mats on the surface of the water and can be harvested, vacuum-packed and shipped around the world. They last many years in the can. The harvesting and sale of brine shrimp products is a big business.
When you want baby brine shrimp as food for your baby fish, you simply take some of the eggs/cysts, put them in salty water, with a good air supply, and they will hatch within 24-36 hours, depending on temperature.
The only tricky part is that the shells of the eggs are not good for your fish so you need to separate the hatchling shrimp from the shells. Fortunately, the shells float, while the shrimp sink and furthermore are attracted to light. So, if you were to somehow put a light down low next to a jar of these things, the shells will float to the top and the shrimp will sink to the bottom.
You can get as elaborate as you want -- some people hatch gallons of these things a day -- but here I will tell you a very simple method of hatching brine shrimp.
You need:
- Two jars (glass or plastic). Tall and skinny is better than short and fat.
- An air supply. This means a piece of airline tubing coming off your air pump
- A piece of stiff plastic tubing, say 8 inches long, much like a thin straw. You can get this in most fish stores. It should fit into the airline tubing.
- Aquarium salt. A pound will last forever.
- Brine shrimp eggs. Buy these in a fish store or by mail order.
The nice thing about hatching brine shrimp is that you don't have to be exact. If your jar holds about a quart, put a heaping tablespoon of salt in the jar along with warm water. Stir it up until the salt disolves. Stick the rigid tubing on the airline, attach the airline to your pump and stick the tubing into the jar. You should now have a bubbling jar of warm salty water. The rigid tubing ensures that the air mixes the water down to the bottom of the jar, otherwise you end up with a pile of dead stuff down there. You want the water to be churning, but not volcanic. Add a teaspoon of brine shrimp eggs.
Wait 24 hours and they will have hatched. The water will be filled with tiny orange shrimp.
To separate the shrimp from the shells, turn off the air and let the jar sit for 5 to 10 minutes. If you can, put a light bulb near the base of the jar and the shrimp will be attracted down. Without the light, it takes longer for the shrimp to settle. The shells will float up. Disconnect the airline from the air pump. Now remove the shrimp by carefully siphoning the shrimp out by sucking on the airline tubing. Siphon the shrimp into your other jar. Alternatively, use a turkey baster to collect the shrimp from the bottom of the jar (but get a new turkey baster and use it only for this purpose).
You feed your baby fish by pouring the contents of this jar into the tank. Watch your little fish go nuts! Soon you will see their little bellies get very fat and turn a pinkish/orangy color. They will be very happy.
If you are busy/lazy like me, simply reattach the airline and let the thing bubble away for another day. You can harvest again tommorrow and maybe even a third day. Then you should start a new batch with fresh water.
There are a million variations on this idea, e.g. various designs that allow you to drain the shrimp out the bottom of the jar by using an inverted water bottle or soda bottle with the airline attached through the cap (on the bottom).
"Build-a-better-shrimp-hatchery" can become an obsession if you are so inclined. Some people start fresh batches everyday. Some people rinse the shrimp -- I've never found that to be of any value, particularly for cichlids because cichlids tolerate and may even appreciate a little salt in the water. You may get as elaborate as you want, but this description is easy, inexpensive and will get you started instantly.
For tons of information on brine shrimp, go to the Brine Shrimp Direct website.
Capturing Cichlids in a Complex Aquarium
Catching cichlids out of a tank with lots of plants or rockwork is always difficult. After many fruitless attempts at catching some young adult Cichlasoma spilurum, I found a way to capture a few of them, using a gravel siphon. The fish always avoid any nets I put in the tank, but they are attracted to the gravel siphon because it often stirs up food. I discovered that some fish were so intent on following the siphon tube, that I could actually catch them in it. Then, I reached down and covered the end of the siphon with a net.
Another technique is to insert your fish net in the tank every time you feed the fish, or at least for several weeks before you know you are going to need to net a bunch of fish. This way, the fish associate the net with feeding, and are not afraid of it when you insert it to catch them.
Observing Spawning Behaviour and Eggs
I needed to count the number of eggs that a large pair of cave-spawning cichlids was laying, but I needed to do it without disturbing the eggs. The solution was to put a 2 gallon glass aquarium on its side, inside their spawning tank. They laid their eggs on the inside of this "glass cave", which I could then remove, photograph, and replace in the tank.
Inexpensive Plastic Plants
Often in research we need large numbers of replicates and the cost of buying hundreds of things like plastic plants can be enormous. I found that you can make some useful plants for a Neotropical fish tank out of green garbage bags. Use only new garbage bags. These are not beautiful so I wouldn't put them in my living room tank, but they are highly functional in terms of providing physical structure in an aquarium.
Start with a new green garbage bag. You don't need the full size bags unless you want really large plants. Cut it along the seams to make one large sheet. Cut that in half so you have two sheets; you now have enough material for two plants. You will also need either a 1 inch rock/pebble or a small handful of gravel, plus an elastic band. The rock serves as the base of the plant and keeps it from floating.
Place the pebble or gravel in the middle of the bag and gather the plastic around it. Seal off the rock with the elastic. Now cut the plastic bag into strips heading towards the anchor, but don't cut them off. You now have leaves. If you are in a hurry, make a bunch of leaves about 1/2 to 1 inch wide. If you are feeling artistic, you can vary the shapes of the leaves.
The end result is surprisingly good considering what it costs and how long it takes.
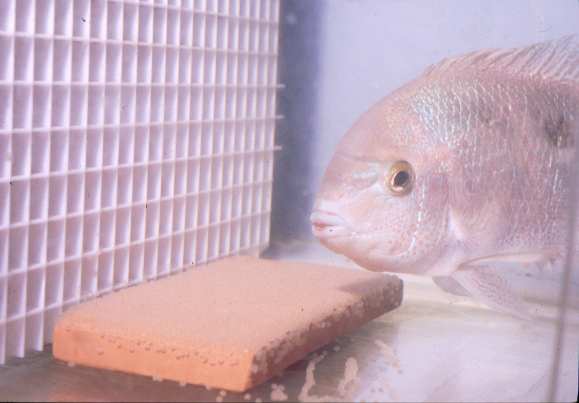
Egg Crate Spawning Divider
Large cichlids present special problems to the cichlid breeder. Because of their large size, they are able to rapidly inflict fatal injuries to a noncooperative spawning partner. One way to control this aggression is to not let the two individuals actually come in contact. Male cichlids are able to fertilize eggs a surprising distance away from their bodies (several inches to over a foot in some cases). We use this fact to our advantage by dividing the pair by a piece of "eggcrate", often used as a diffuser for fluorescent lights. The fish can see each other and sperm can easily pass through the egg crate, but the female is safe on her side of the barrier.
Use a Background on your Aquarium
One of the best ways to ensure that your cichlids are comfortable in your aquarium is to put some sort of background on the back and sides of the tank. Partly this helps to make the tank look better, but more importantly it provides cover for the fish. Whether they believe that a picture of plants and wood and rock is actually made up of those things we do not know. But, it does seem clear that if there is such a background, the fish spend less time "worrying" about being attacked from that side. If cost is an issue, even a simple background will do. I use old fanfold computer paper or green plastic bags on my research tanks.
![[Go Back to Contents]](gifs/back.gif) |
![[Send email to Ron Coleman]](gifs/address.gif) |
|
![[Go to Contents of Cichlid Research Home Page]](gifs/cichres.gif)